Thursday, January 21, 2010
Dammit Dolls
When you want to kick the desk or throw the phone and shout,
Here's a little dammit doll you cannot do without,
Just grasp it firmly by the legs, and find a place to slam it,
And as you whack it's stuffing out, yell,
dammit, dammit, dammit!
thought it was so cute , now you can buy these off many places on the net and they come in many shapes and sizes but why do that when you can make your own you can make a container to go with it as well instuctions are found on this great site
http://www.exploringwomanhood.com/homelife/ideas/pom-sep06.htm
i will be making these as i need one for when i get mad and yell DAMMIT !!!!!!...............LOL enjoy everyone
Monday, January 11, 2010
cargo bag & other tutorials
http://noodleheads.blogspot.com/2010/01/tutorial-messenger-bag-from-cargo-pants.html
this great pillow case tutorial is real nice i have been wanting some new pillow cases but why dont i just make them there is just so many cute fabrics out there that i can do it with for the instructions head here to this wonderful blog
http://littlebirdiesecrets.blogspot.com/2008/07/novelty-pillowcase-tutorial.html
Monday, July 6, 2009
pinfore giveaway by lisa
Sunday, July 5, 2009
another one of my own tutorials : spaghetti strap tank top alteration


it should now look like this now repeat with the other one i did the other one the same i just cut the plastic hoop before doing the steps
Friday, July 3, 2009
braided headband tutorial
 today i found this great tutorial for a braided headband iam a real freak for headbands since i have long hair and i hate it in my face so if i can keep it back with a headband its a good thing ( sorry "martha" for quoting you) but untill i get a sewing mashine i can't sew any of this unless i sew by hand but most projects i see is sewen by mashine so i guess i wont be sewing much except mending and alterations on my clothes...LOL. here is the link for this great totorial on this lovely lady's blog
http://lubirdbaby.blogspot.com/2009/06/5-min-braided-headband-tutorial.html
Tuesday, June 23, 2009
banadana quilt tutorial & my puzzle project

today i found a great tutorial for a quilt made from bandanas i totally love this idea dont get me wrong i love buying fabric and doing it the tradional way but this is so much easier and great for that picnic in the park or that special teen i really want to make one so go to this great lady blog for the tutorial
http://www.mrsdlightful.com/2009/06/easy-outdoor-quilt.html
i'm working on a big star trek poster puzzle right now finally got it finished and just glued it together but for some reason some of the peices keep commoing apart i have put 3 layers of glue i guess i should have not used the cheap - o puzzle glue from walmart that and the glue is old ( by the way does glue expire ???) i was on you tube looking on how to glue a puzzle and found a video on how to glue a puzzle using mode poge ( maybe that will hold it together better ???) well i have
Saturday, June 13, 2009
ice pack wrap & slice cookies

i was browsing my usaul blogs i like to read and found two great ideals one is this very neat ice pack wrap you can make with a siple tea towel all you do is sew a pocket on it and then sew velcro on the sides and pop a ice pack in the pocket and wrap it around your leg and this way you can walk around if you need to i think you could make a smaller version for the kids if you wanted to maybe i just might try making a smaller one for my friend instructions are found on this lovely ladies site
http://finnyknits.blogspot.com/2009/06/icy-knees-tutorial.html

Sunday, June 7, 2009

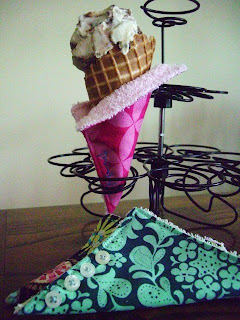
found this great tutorial toaday for ice cream cone covers so when the kids are eating ice cream the ice cream won't drip on there hands seams a good ideal as soon as i get my sewing mashine fixed i will make some of these for neices and nephews i think alot of people will love these
so go to this great ladies website for the instructions she has alot of other projects too
http://theobjectproject.typepad.com/the_object_project/2009/05/ice-cream-cone-cozies-tutorial.html
Friday, June 5, 2009
2 quilting projects


Saturday, May 30, 2009
baby sewing project - ruffle butt onsies

Thursday, April 16, 2009
recycled bath mat sewing project
 I was surfing the web today and found this lovely bath mat made out of recycled material almost like a patchwork quilt and its embroiled with your feet. iam totally making one for my bathroom it looks so bare and my bathroom floor is always so cold i think it will really brighten the bathroom up now i just wonder if hubby will let me trace his feet ????...LOL okay maybe not but i think if you have some kids it would be cute to trace there feet and embroiler it as the lady on this site said so and i quite agree with her maybe when i have kids i will do that but this project sound like alot of fun makes me want to try it even more i love intresting fun projects like this might make one for my mother in law too i thinks she could use one anyway just follow the link for the instructions to this great lady's blog
http://sewliberated.typepad.com/sew_liberated/2007/11/recycled-bath-m.html
Monday, March 23, 2009
my first tutorial - cookie cutter bin

i'm finally doing my first YAY !!!! i'm so excited i created this today as i have all these cookie cutters but no where to put them so i thought i would share my creation but you don't just have to use it for cookie cutters it can be used for mostly anything craft suplies, kids toys, bits & bobs money etc...
1 pair of sizzors or exacto knife
stickers, embelishments etc...

take a clean 2.3 kg empty juice container or any round container like a coffee tin will due i just happen to use this as i just finished my juice crystals & mesure with your mesuring tape how long around it is and how wide down
then take your sheet of paper and your mesuring tape and mark with your pen how far you need to cut your paper
then cut it to size since i'm using a 12x12 i won't quite have enough but i will show you how to fix this problem in this tutorial
spread the glue stick all over your paper so you can stick it on your container ( if your using a medal contanier you will be using a glue gun for this step)
stick your paper around the container if your antthing like me you might have to glue the edges after you put it on ( but that might be a good ideal to do anyway) you may use a exacto knife if your paper is too long as mined is ( I could never could learn to cut straight...LOL)
now here is the steps in case the paper is too short but you have extra left over
mesure the extra space you have left and take your extra paper left over and cut it to size just like you did in the begining of this project

now i did not mesure it so i ended up cutting strips out of some more extra and gluing them on that is why its important to mesure ...LOL
after you do all this it sould look like this
now take your stickers and other embelishments to decorate the tin if you wish
now fill the tin with what you want and replace lid

i thought this bin just looked so cute i had to share with you all what i made
Wednesday, February 25, 2009
why am I up at 3AM ??? and a great sewing project
 well here i am at 3am still up i usally shut this off by 11pm 12 am latest iam so wiered i slept today until 4:30 pm for some reason maybe i'm comming down with a cold (I hope not ,I hate to be sick too much to do) besides i have to get my apartment clean i have a eltrican coming next week don't want him to see my basment apartment in shambles (its small enough down here...LOL_) anyways so i have decided to look up my favorite things on the net craft and sewing projects and found such a great bag to sew its a patch work bag that is reversible (well its a string backpack) i think its so great i don't usally where these things but i love quilting and it looks so hype so if i ever get my sewing mashine working that my nice landlord gave me to use (bless you kimberly) or get a new one i will try tomake this bag the tutorial for this bag is here on this nice lady's blog here is a picture of the bag
see what i mean just perfect in my opion i think i will make them for my neices who are 12 and 14 they will love them by the way here is the link
http://ayumills.blogspot.com/2008/09/tutorial-reversible-patchwork-bag.html
now if i can just goto sleep if anyone has any ideas please tell me by leaving me a coment i need to have some sleep maybe i can read my new book i'm reading i swear i read more then some people i should blog about that one day must make a mental note of that ....LOL
Sunday, February 8, 2009
Valentine Bear Recipe/Photo Holder

White (5001)
Cadmium Red (5382)
Raw Sienna (5392)
Ecru (5093)
Black (5042)
Silver (5129)
16-gauge brass wire
Black Marker
Straight Pins or toothpicks
Pasta Machine, clay dedicated
Kemper Heart Cutters
Sculpey Super Slicer Cutting Blade

Step 3. For the arms, roll two 5/8” balls of Raw Sienna into tapered logs and attach to sides of body.

Step 5. For the bear’s head, roll 7/8” ball of Raw Sienna. Press two “E” beads into head for eyes. Use pin to make squint marks. Roll two 5/16” balls of Raw Sienna into ½” logs. Fold in half, attach as ears. For muzzle, roll ¼” ball of Ecru. Flatten into oval and attach to face under the eyes. Roll 1/8” ball of Black, flatten and attach as nose. Use pin to draw mouth and the line from nose to mouth. For bow, mix Cadmium Red and White to achieve desired shade of pink. Form bow using heart cutters and a small dot in the center. Attach to head and then press head onto body.


Step 9. Press bear and cookie tray onto base. Place sentiment sign behind cookies. To make wire recipe/photo holder, cut a piece of wire 5 – 6” long. Use hobby pliers to twist end 2 ½ times into a circle. Insert beside bear. Bake according to manufacturer’s instructions.


